-
[ios - Swift] Push 알림 사용하기 (UNUserNotificationCenter 1/2)ios 2020. 12. 6. 01:50
이번 글에서는 UNUserNotificationCenter를 사용해서 앱 알림을 사용해보도록 하겠습니다.
1. UNUserNotificationCenter
override func viewDidLoad() {
    super.viewDidLoad()
    UNUserNotificationCenter.current().delegate = self
}
func permission_Notification() { let notification = UNUserNotificationCenter.current() notification.getNotificationSettings { (setting) in if setting.authorizationStatus == .authorized { print("Push OK") } else { notification.requestAuthorization(options: [.alert, .sound, . badge]) { (complete, error) in DispatchQueue.main.async { if (error != nil) { print("Error") } let cancle = UIAlertAction(title: "취소", style: .cancel) { (action) in exit(0) } let move = UIAlertAction(title: "이동", style: .default) { (action) in UIApplication.shared.open(URL(string: UIApplication.openSettingsURLString)!) } let alert = UIAlertController(title: "요청", message: "동의해주세요", preferredStyle: .alert) alert.addAction(cancle) alert.addAction(move) self.present(alert, animated: true, completion: nil) } } } } }우선 델리게이트를 선언 및 권한 요청입니다.
badge는 앱 아이콘에 표시될 알림의 수입니다.

그 이외에도 많으니 이곳을 참조해 보면 될 것 같습니다.
다음으로 버튼 이벤트를 등록해 주도록 하겠습니다.
2. 버튼 이벤트
@IBAction func click_1(_ sender: Any) {
    let content = UNMutableNotificationContent()

    content.title = "poky-develop"
    content.subtitle = "UNTimeIntervalNotificationTrigger"
    content.body = "지정된 시간이 경과하였습니다."
    content.badge = 1

    let trigger = UNTimeIntervalNotificationTrigger(timeInterval: 5, repeats: false)

    let request = UNNotificationRequest(identifier: "time", content: content, trigger: trigger)
        UNUserNotificationCenter.current().add(request, withCompletionHandler: nil)
}


@IBAction func click_2(_ sender: Any) {
    let content = UNMutableNotificationContent()

    content.title = "poky-develop"
    content.subtitle = "UNCalendarNotificationTrigger"
    content.body = "특정 시간입니다."
    content.badge = 1

    let date = Date(timeIntervalSinceNow: 10)
    let dateCompenents = Calendar.current.dateComponents([.year, .month, .day, .hour, .minute, .second], from: date)
    let trigger = UNCalendarNotificationTrigger(dateMatching: dateCompenents, repeats: false)

    let request = UNNotificationRequest(identifier: "Calendar", content: content, trigger: trigger)

    UNUserNotificationCenter.current().add(request, withCompletionHandler: nil)
}
UNUserNotificationCenter에 특정 동작 트리거를 등록해야 하는데
이번 글에서는 UNTimeIntervalNotificationTrigger, UNCalendarNotificationTrigger를 사용하도록 하겠습니다.
알림 트리거의 종류는 다음과 같습니다.
UNTimeIntervalNotificationTrigger: 지정된 시간이 경과되면 발생
UNCalendarNotificationTrigger: 특정 날짜 및 시간
UNLocationNotificationTrigger: 지정된 지역에 들어오거나 나갈 때
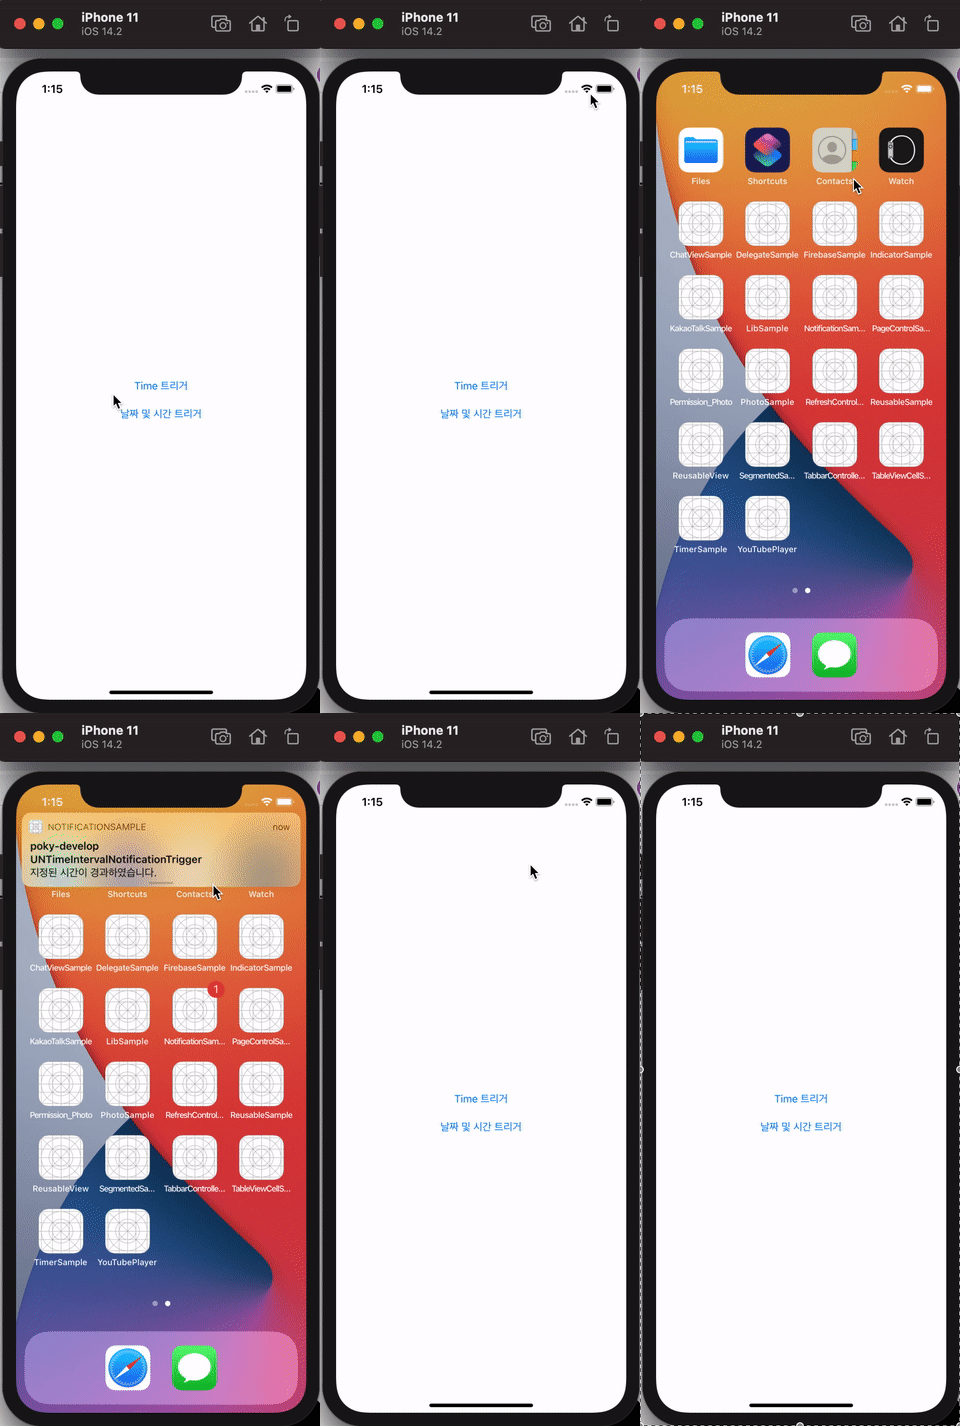
UNPushNotificationTrigger: 푸시 알림 서비스에서 전송되었을 때빠른 테스트를 위해 5초, 10초 후 알림을 푸시하도록 설정했습니다.

알람 푸시가 정상적으로 작동하는 것을 확인할 수 있습니다.
이제 어떤 알람을 푸시했는지 확인해 보도록 하겠습니다.
3.UNUserNotificationCenterDelegate
extension ViewController : UNUserNotificationCenterDelegate {

    func userNotificationCenter(_ center: UNUserNotificationCenter, didReceive response: UNNotificationResponse, withCompletionHandler completionHandler: @escaping () -> Void) {
        UIApplication.shared.applicationIconBadgeNumber = 0

        print("identifier: \(response.notification.request.identifier)")
    }
}
badge를 초기화 해준후 이전에 등록한 알림의 식별자를 출력했습니다.

다음 시간에는 포그라운드 상태에서 알림 푸시가 되는 것을 진행해 보도록 하겠습니다.
'ios' 카테고리의 다른 글
[ios - Swift] UIImageView Gesture 동작 안하는 문제 (0) 2020.12.08 [ios - Swift] Foreground Push 알림 사용 (UNUserNotificationCenter 2/2) (0) 2020.12.06 [ios - Swift] 카메라, 앨범 권한 설정 (2) 2020.12.01 [ios - Swift] Delegate를 사용해서 뷰에 데이터 전송하기 (0) 2020.11.30 [ios - Swift] 키보드 사용시 뷰 올리기 (0) 2020.11.26